How to create optimized posts using WordPress
WordPress is one of the most widely used blogging tools that offers exceptional user control through a multitude of features, plugins, and themes. After you install WordPress using our “How To Create A Website” guide, you will need to get familiar with WordPress’s easy-to-use interface.
WordPress Posts

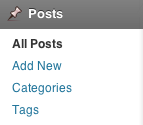
In the top of the left sidebar of the WordPress Dashboard you will find the posts field. Click or hover your mouse over “Posts” view all posts, add new posts, and manage post categories and tags.
Adding a New WordPress Post
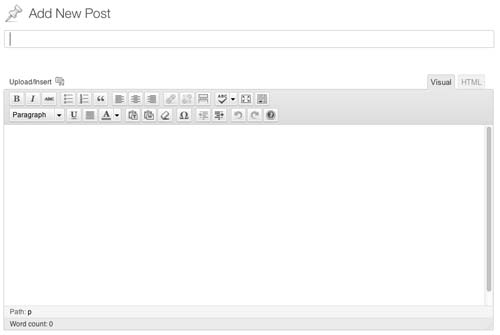
- Choose Posts > Add New in the left sidebar
- Enter your keyword optimized title in top title editor (40-70 characters with spaces).
- Enter your body text in the main field below the title, using either the WordPress Visual Editor or the HTML Editor. If you choose to use the HTML editor, you should brush up on the Basic HTML Tutorial.

WordPress Visual Editor

- Bold
- Italicize
- Strikethrough
- Unordered Bullets
- Numbered/Ordered Bullets
- Block Quote
- Left Align
- Center Align
- Right Align
- Hyperlink
- Break Hyperlink
- More Tag (don’t use this tag)
- Page Break (insert page breaks after every 500-600 words)
- Spell Check
- Full Screen Mode
- Show/Hide Kitchen Sink (always show kitchen sink to help you format text if you are not hard coding with HTML. Kitchen Sink includes options to add header tags, indent, change font color, etc.)
- StarRating Shortcodes (don’t use)
- Custom Shortcodes (don’t use)
- YouTube Video Embed
- Drop down menu that adds header tags and other formatting tags
- Underline
- Full Align
- Change Font Color
- Paste as Plain Text
- Paste from Word
- Remove Formatting
- Insert Custom Character 28. Outdent
- Indent
- Undo
- Redo
- Help
WordPress Post Categories & Tags

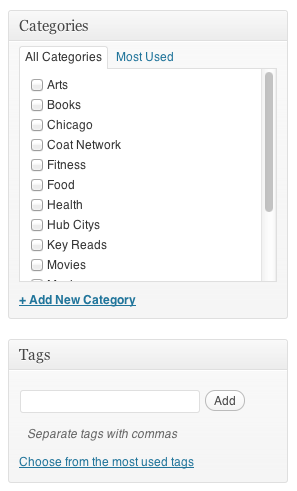
Post Categories – Helps navigation through posts and groups together related content on a website. Every post is published in one or more categories that best describe the content.
Post Tags – Post tags are similar to categories in that they group together related content, but tags are more specific. Tags should include your target keywords that you have used throughout your post. Add 5-7 tags for each post and make sure that they are all present somewhere in the body text.
Inserting Media Into WordPress Posts
- Above the body text editor choose Upload/Insert
- Add media from your computer, a URL, your gallery or your media library. Your gallery includes the media you have uploaded in the specific post. Your media library includes all media uploaded onto the WordPress client.
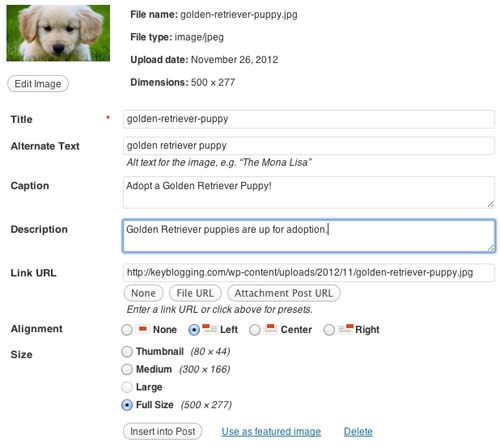
- In order to optimize images for search engine rankings, you must add title, alternate, caption, description, and media tags.
- Title – Image title to be displayed as a tooltip (when a mouse is hovered over the image). Include keywords in the title of your image.
- Alternative Text – Image alternate text (description text that search engines use to understand your image). E.g. for an image of a golden retriever puppy your alt text would be “golden retriever puppy.”
- Default Caption – Image caption to be displayed when using captions. d. Description – Full image description.
- File URL – This is the location of your image.
- After you update these setting, make sure to click Save All Changes. Now you uploaded images will move to the Gallery tab.
- You can insert images throughout the body text by clicking Insert Into Post.
- You should always have a featured image. Choose Use as Featured Image next to Insert Post to designate your featured image. You can also set your featured image in the bottom right sidebar.

Run through this checklist when creating your new post and then click Preview, Save Draft, or Publish! (You can also schedule the time your post is published by clicking edit next to Publish Immediately).
- Title
- Body Text
- Post Categories
- Post Tags
- Images and other media are inserted and attributes are defined
- Featured Image
